I am learning Pulumi and I'll be sharing my journey along the way here in the form of blog posts and code samples on my GitHub. Join me on this journey if this topic interests you.
Disclaimer: I have hands-on experience working with Microsoft Azure Cloud platform not so much with others. So in here, I'll be looking at Pulumi from Azure's lens and most of my references and examples will be with Azure.
If you haven't read my previous blog posts around this topic, you can check them out here:
In this blog post, I'm going to explore and understand How Pulumi works. What are the underlying core concepts and toward the end, will add a 'Hello World' to see in practice.
How Pulumi works?
So let's try to understand how Pulumi actually works. Let's have a look at the Pulumi Engine Diagram that is take from their website.
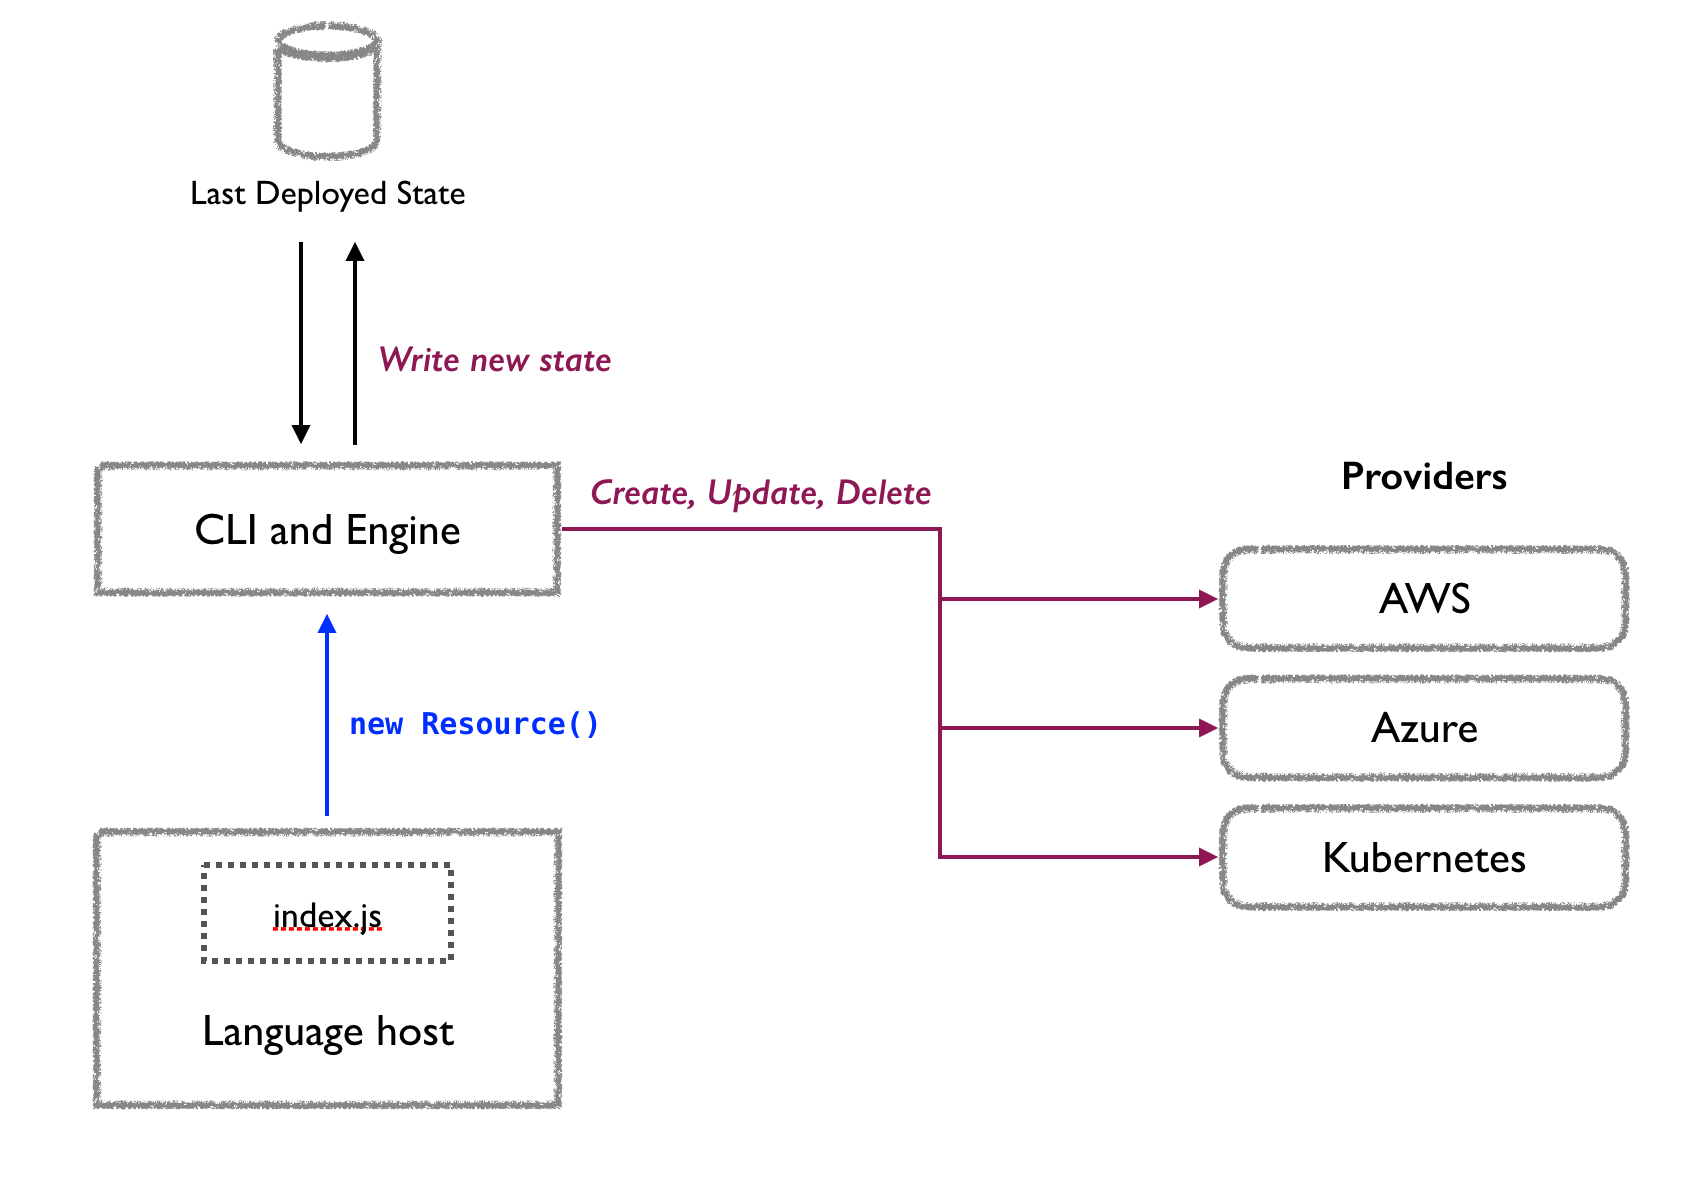 Pulumi Engine Diagram from Pulumi.com
- You write a Pulumi Program which is executed by a language host
- You handover that Program to the Engine (using the Pulumi CLI)
- The engine compares the desired state of your infrastructure with the stack's current state and figures out the needed changes
- The engine then uses resource providers to manage the resources
Let's try to understand these concepts a bit more.
Core Concepts
Pulumi Programs
Pulumi programs are basically any program you written in any supported language of your choice (JavaScript, TypeScript, C#, Python, Go ... ). Pulumi provides SDKs for supported languages and you install the required packages (nuget, npm etc. ) to work with your providers besides the libraries you use for native languages
Desired State
State is at the core of all this. Pulumi manages the state (in the form of a state file). This is the source of truth for Pulumi. Whenever you make any change in your program, Pulumi refers to that state and check with the resource provider to determine what action needs to be taken (update, delete, add or nothing).
Backends
Pulumi provide two approaches to manage the state
- The Pulumi Service backend (a free hosted service that Pulumi offers. https://pulumi.com )
- A self-managed backend, either stored locally on your filesystem or remotely using a cloud storage service By default, Pulumi uses it's hosted service backend. This makes it almost trivial to get started and you have the flexibility to take the control yourself if you wish so.
Language hosts
Responsible for running a Pulumi program. Consists of:
- Language Executor
a binary that is used to launch the runtime (e.g., pulumi-language-dotnet.exe). Comes with the CLI. I installed Pulumi via Chocolatey so this is the location for this for me: C:\ProgramData\chocolatey\lib\pulumi\tools\Pulumi\bin - Language Runtime
Responsible for preparing your program to be executed. The runtime observes the execution of a program and detect resource registrations, communicates the registration request to the deployment engine. The runtime is distributed as a regular package. Here is the one for .NET on nuget, node on npm etc.
Deployment engine
The engine is responsible for achieving the desired state you have specified in your Pulumi program. Given the program from language host, it checks the local state, talks to resource providers and take all sorts of decisions to get you to the desired state. You interact with the engine with the CLI.
Stacks
A stack is an isolated, independently configurable instance of a Pulumi program. You use them to represent various environments like dev, stage and prod (I use them like this so far). Or you can represent feature branches like feature-x-dev, feature-y-dev.
Resource Providers
This is how you talk to your target cloud platforms like Azure, AWS and other SaaS platforms. Consists of two parts:
- Resource Plugin
Again, a binary that the deployment engine uses to manage a resource. You can manage plugins using
pulumi pluginfrom the CLI You can find these in your user directory (for me it's at: C:\Users\sanja.pulumi\plugins - I'm on Windows machine) - SDK Just like the language runtime, available as packages. These determine the type of resources any provider can manage. For Azure, you have this nuget package for C#
Pulumi CLI
This is your gateway to the Pulumi world. You interact with Pulumi via CLI for all the operations you want to carry on.
Take Pulumi for a ride
Now we have got a fair understanding of how Pulumi works and what are various components involved. Let's change the gears and see it in action.
Setting up the environment
The first thing we need is to set the environment to work with Pulumi. Pulumi has a really good getting started guide. Here is the one for Azure specifically. So please follow the guide and install and configure your environment. What you should have after the setup is:
- Pulumi CLI Installed
- IDE of your choice (VS Code, VS etc.)
- Azure Subscription
- Pulumi Service Account (for state management) (https://pulumi.com)
I am setting the environment on my local Windows 10 machine. You can install Pulumi CLI in a docker container if you wish.
Hello Pulumi
Now having our environment setup, let's start with the quintessential Hello world application with Pulumi! And what's the Cloud equivalent of Hello World? Creating a resource group and a storage account - isn't it 😆 Let's do it!
Create a new project
Fire up your terminal and type the following command
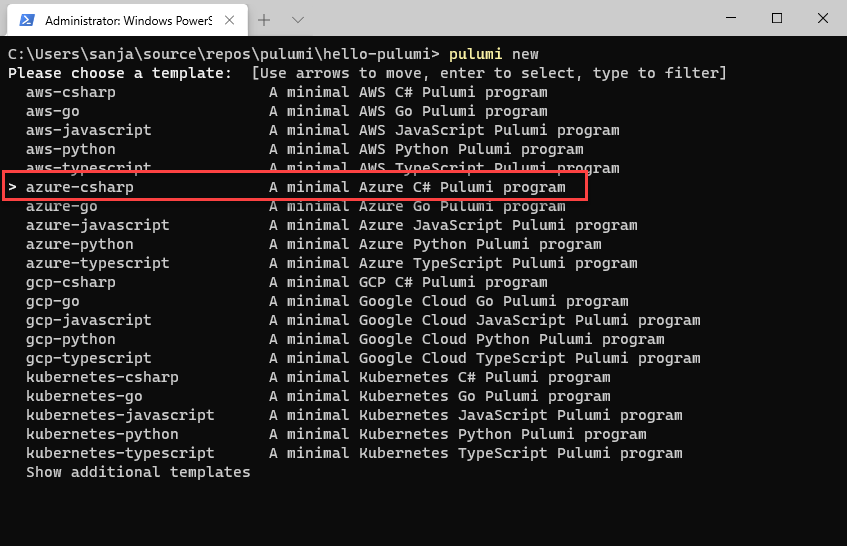
pulumi new
This is an interactive command. You will be asked to choose the template first:
Next, set the project name, description, stack, location (you can simply enter to set recommended names or change the names).
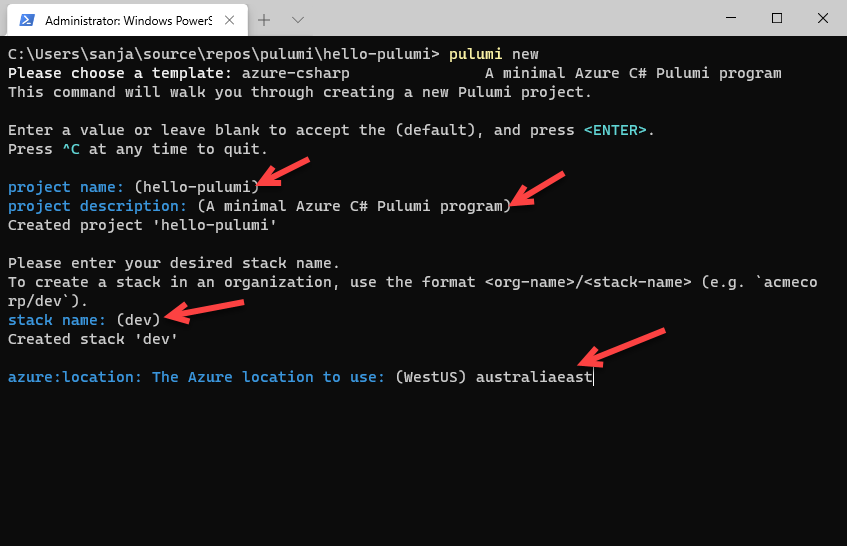
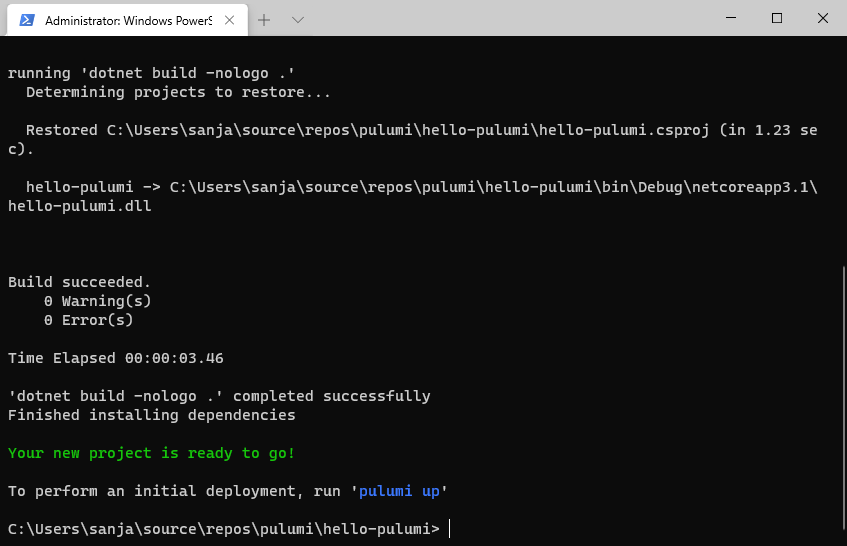
Pulumi then goes ahead and initializes the project for you.
or you can simply pass the arguments at the time of creation:
pulumi new azure-csharp --stack dev --name hello-pulumi --description "Minimal C# Pulumi Program"
Let's see what Pulumi has created for us.
Enter code . in your terminal to open up the VS Code.
Projects
A Pulumi project is any folder which contains a Pulumi.yaml file. A project specifies which runtime to use, which determines where to look for the program that should be executed during deployments. Supported runtimes are nodejs, python, dotnet, and go.
This is how my structure looks like:
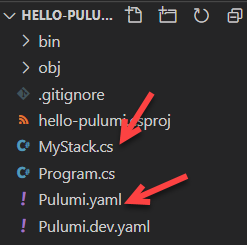
My YAML files looks like this:
  name: hello-pulumi
  runtime: dotnet
  description: A minimal Azure C# Pulumi program
You also get a YAML file with your 'Stack' name that contains some configurations.
MyStack.cs file is actually the stack that contains our desired state which we want to achieve
Program.cs file is just an entry point to execute the stacks
using Pulumi;
using Pulumi.Azure.Core;
using Pulumi.Azure.Storage;

class MyStack : Stack
{
    public MyStack()
    {
        // Create an Azure Resource Group
        var resourceGroup = new ResourceGroup("resourceGroup");

        // Create an Azure Storage Account
        var storageAccount = new Account("storage", new AccountArgs
        {
            ResourceGroupName = resourceGroup.Name,
            AccountReplicationType = "LRS",
            AccountTier = "Standard"
        });

        // Export the connection string for the storage account
        this.ConnectionString = storageAccount.PrimaryConnectionString;
    }

    [Output]
    public Output<string> ConnectionString { get; set; }
}
Stacks inherit from Stack class.
In this program, we have defined a resource group and a storage account in that resource group. And finally we are exporting a connection string property (Output) once the storage account is provisioned. This will be output after the execution of the program.
Preview the changes
Once you are ready with the program, you can use the preview command
pulumi preview
This tells you what Pulumi is going to do when you actually deploy. This is a really good way to test the impact before actually deploying the program and allows for the faster feedback loop

As we discussed already, Pulumi offers a backend service for state management. If you follow the link (View Live) in the console, you will be able to see the state preview on the backend service.
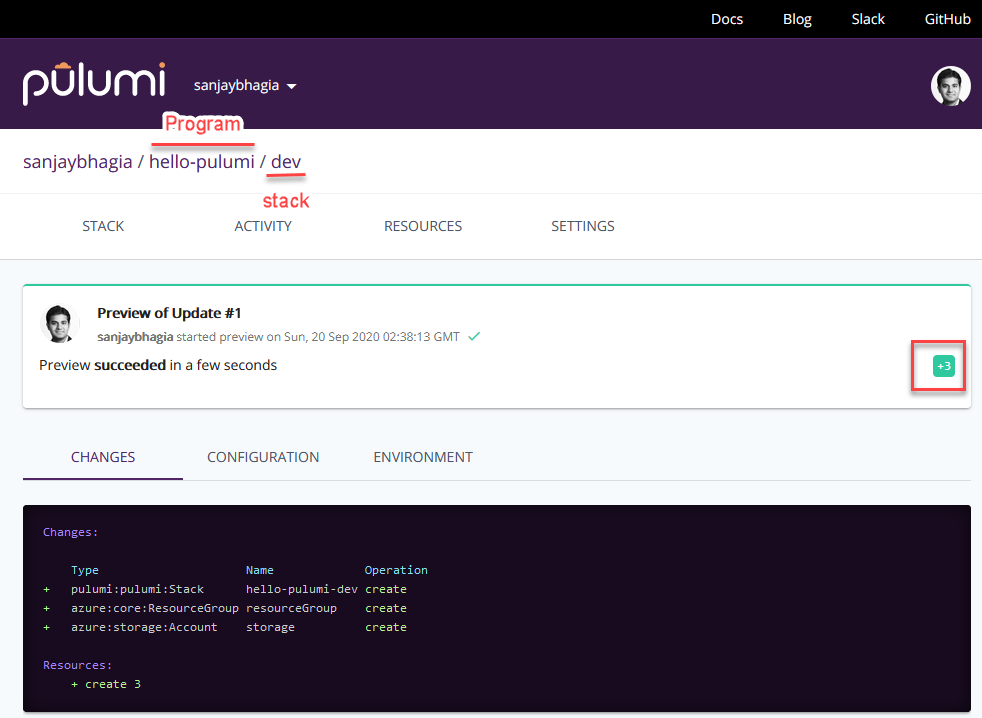
It looks similar to what you already have on your console.
Let's deploy the changes now.
Deploy the Changes
pulumi up
By the way, pulumi up also does preview before and gives you the opportunity to go ahead of reject the deployment.
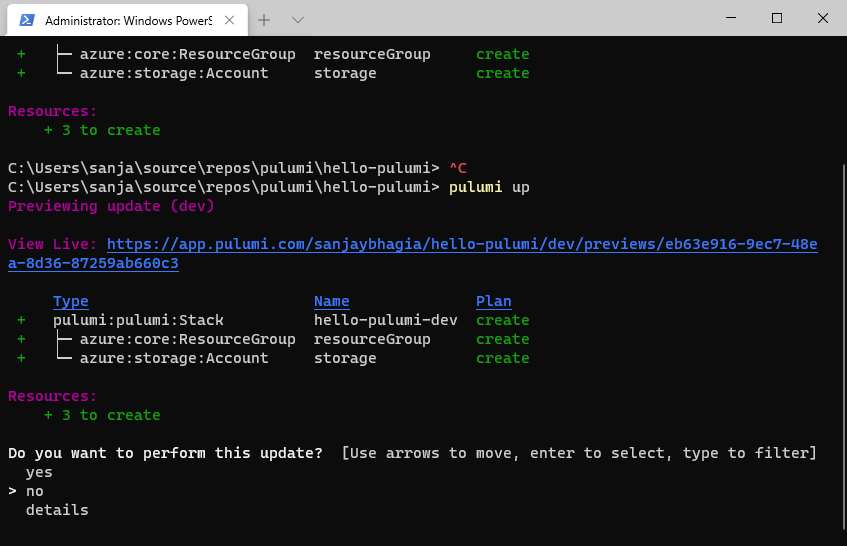
Go ahead and select 'yes' and let Pulumi deploy the changes.
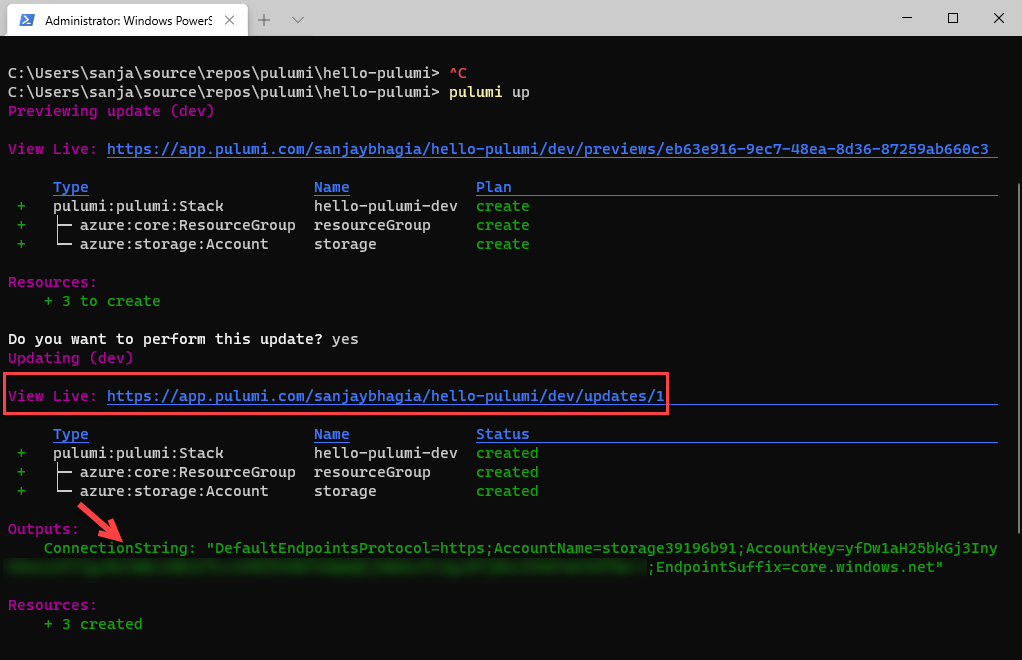
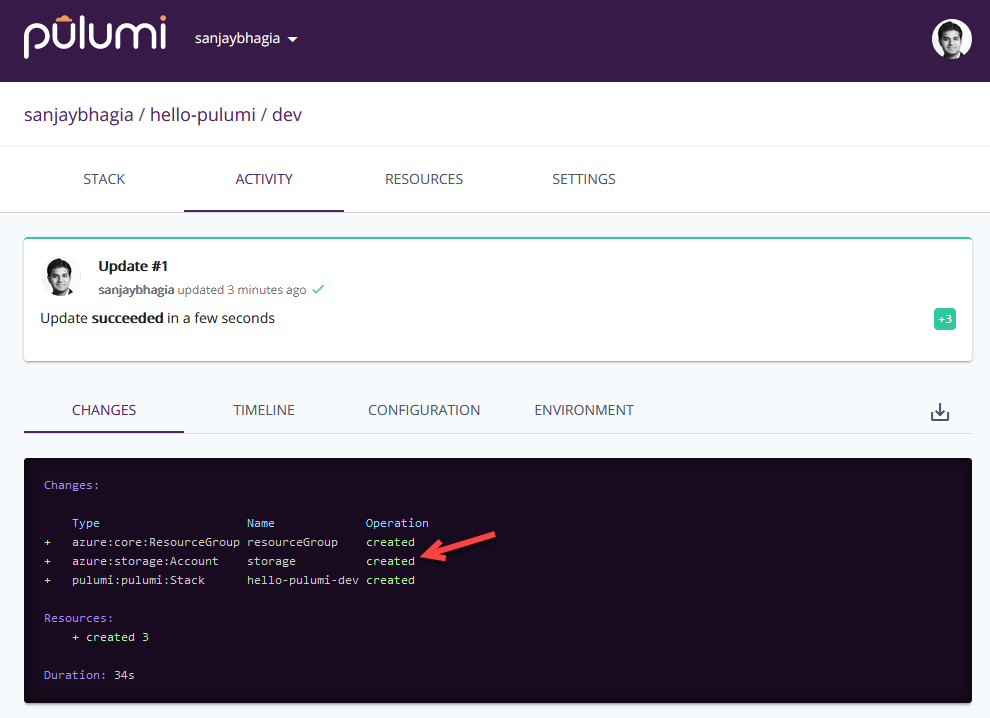
As you can see, after successful deployment, you have a 'View Live' link taking you to the Pulumi backend service and 'ConnectionString' of the storage account as output.
Reviewing the Changes
Now that we have deployed the resource successfully let's check Pulumi's state by following the URL
Now, just move your cursor in Changes windows on Pulumi you will see few buttons appearing on the top right. Click 'diff' there. Here you will be able to see the log of what has been created/changed for you compared to the previous state.
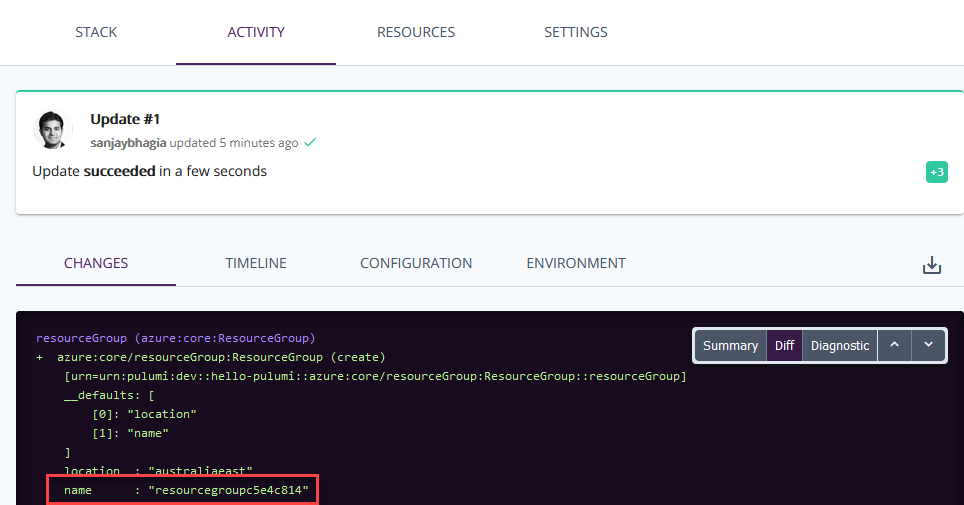
Note, the name of the resource group here. In our Program, we simply specified the name as 'resourceGroup', this is not the real name, this way Pulumi generates a random unique name at the time of execution, that's why we get the random numbers after our specified name. If you want to specify the name of the resource you want, you will need to specify the 'name' property explicitly for that resource.
Verify the deployment
So far, Pulumi is telling us everything looks great but let's verify it in Azure. Navigate to Azure Portal and search for the resource group name you noted earlier.
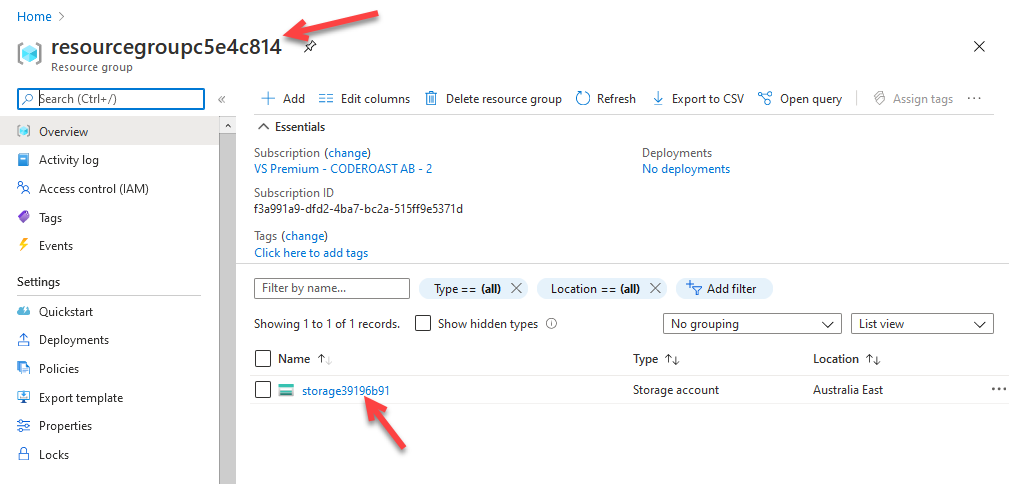
So, it went fine after all. We have a resource group and a storage account within that resource group. All good
Update the program
Now, let's make a quick change by adding a tag in our Storage account resource. Add the following line after 'AccountTier' property in your storage account resource.
 Tags = {
          { "Environment", "Dev" }
        }
Back to your terminal, enter
pulumi up
Since we have made a change after deploying the program earlier, Pulumi already has a state of our infrastructure. When you do Pulumi up now, Pulumi will compare the state it has for our stack and will tell you what changes it has detected and going to update.
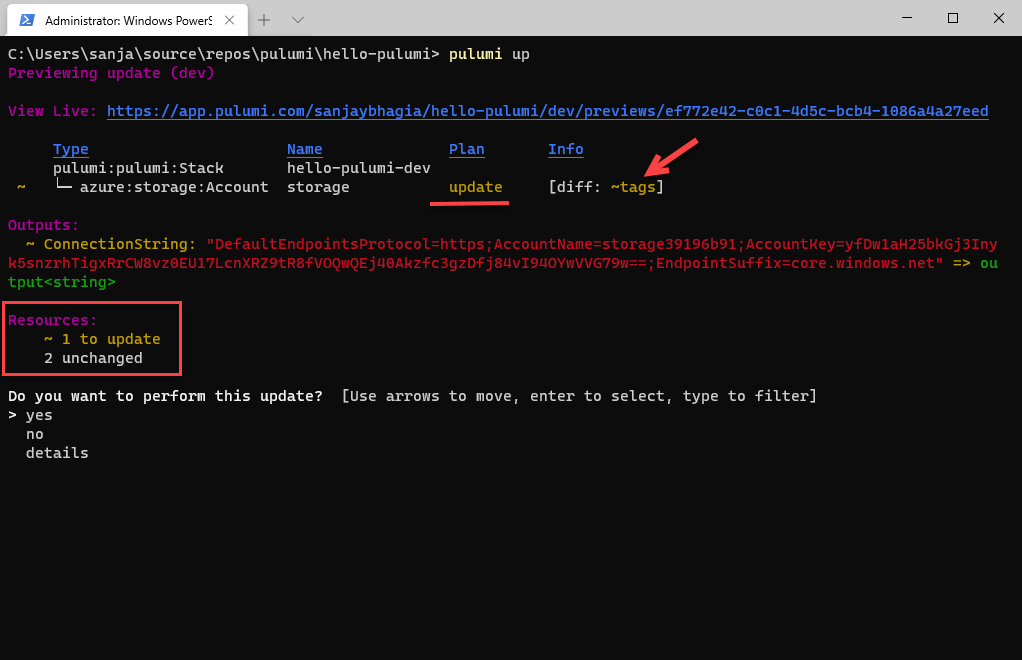
select 'yes' to deploy the change
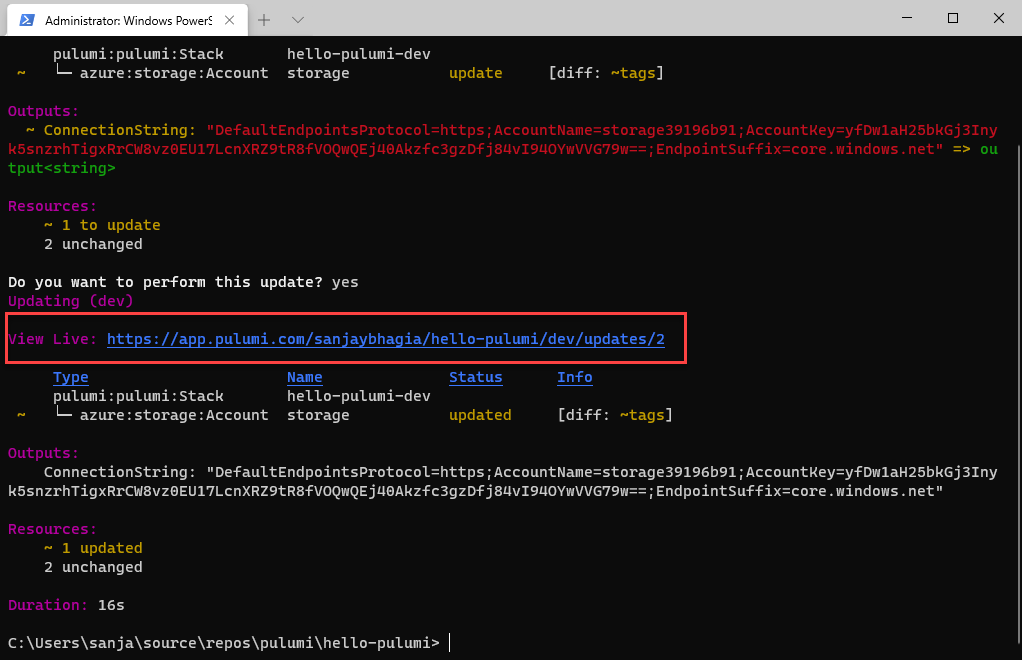
As you can see, Pulumi successfully deployed our change. Follow the Pulumi link to preview the change. Notice, this URL is different to the previous one. You will be able to see all the updates that have made on your stack on the backend service.
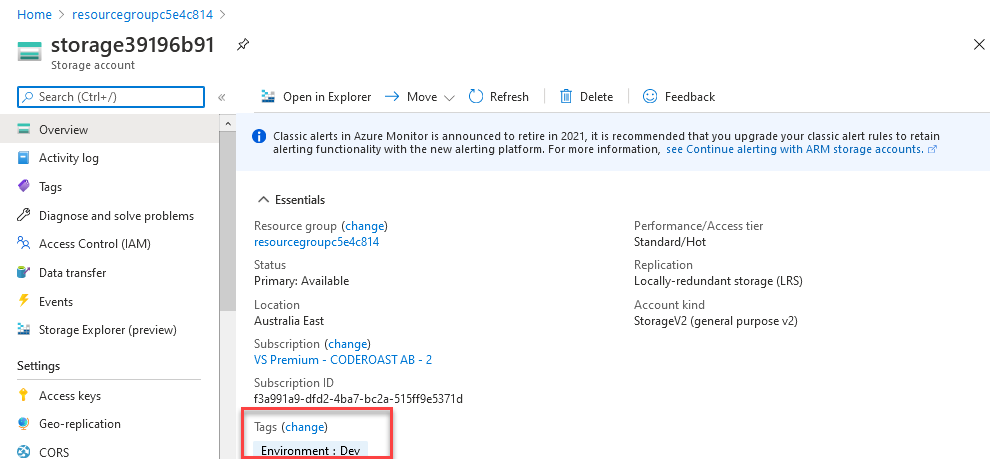
Head back to the Azure portal and open the storage account again and see that our tag has been applied now.
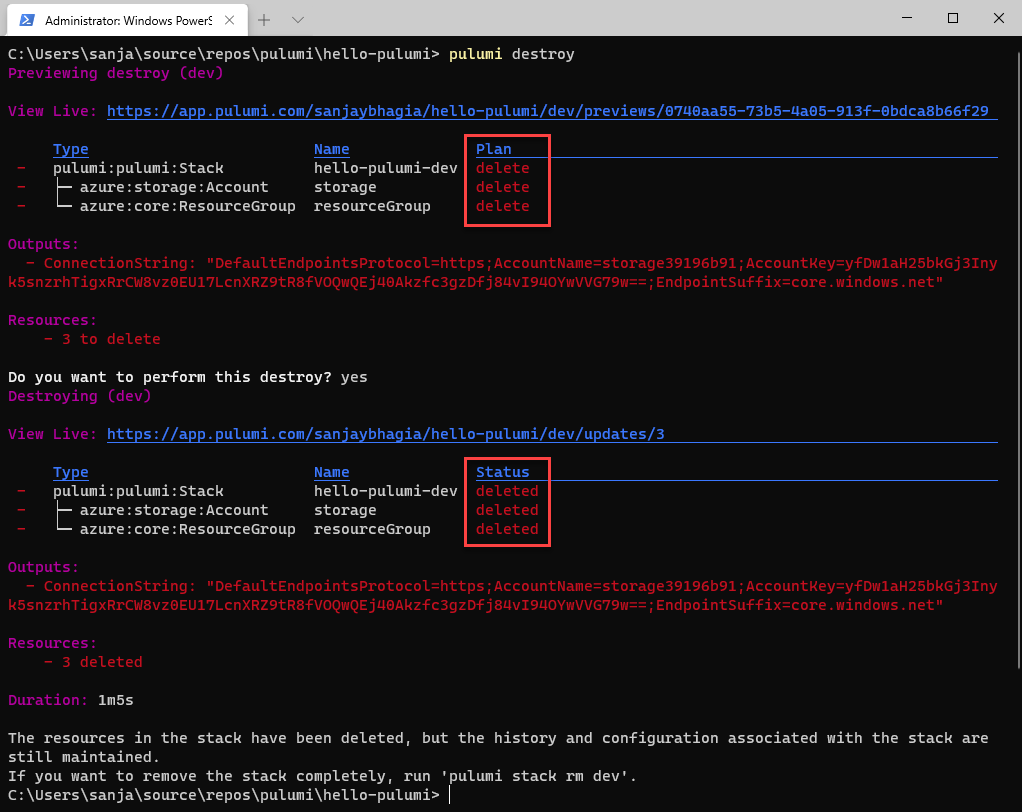
Destroy
If at this stage, you want to delete the state, it's as simple as executing the following command
pulumi destroy
By this, we are telling Pulumi to just delete the stack.
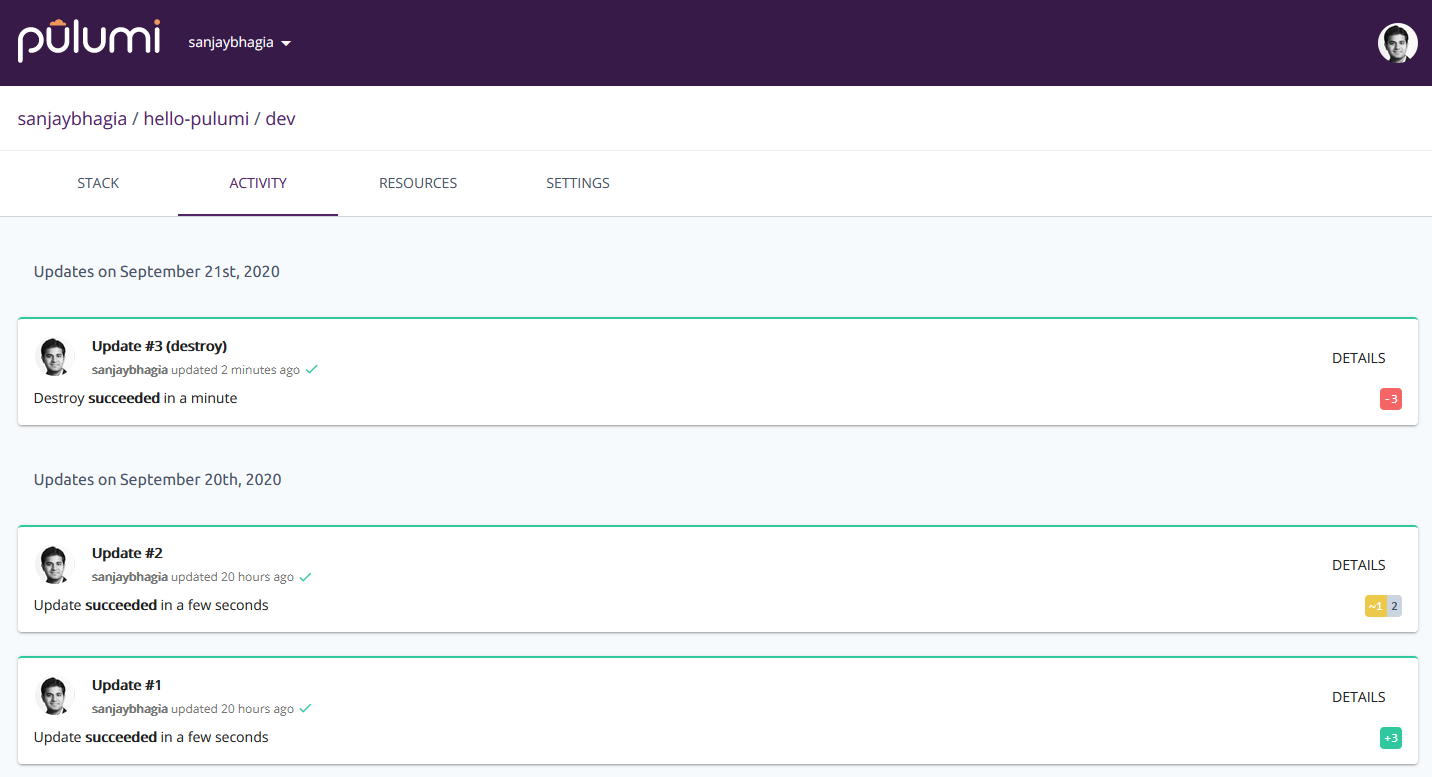
If you head back to the Pulumi backend service and see the 'Activity' of your stack (dev) you will be able to see all the changes that you have made to your state
Summary
We discussed how Pulumi works, what are the core concepts while working with Pulumi. How to set up the environment and write your first Pulumi program. We also looked at the Pulumi's backend service (a free hosted state management service) to review the changes while you are working with your infrastructure.
Signing off
I hope this blog post helped you understand the core concepts involved while working with Pulumi and also gave your some idea of how it is to work with Pulumi. Give it a go, it's very easy to get started working with Pulumi. If you have any questions or feedback, feel free to drop the comment.
Cheers
comments powered by Disqus