I am learning Pulumi and I'll be sharing my journey along the way here in the form of blog posts and code samples on my GitHub. Join me on this journey if this topic interests you.
Disclaimer: I have hands-on experience working with the Microsoft Azure Cloud platform not so much with others. So in here, I'll be looking at Pulumi from Azure's lens and most of my references and examples will be with Azure.
If you haven't read my previous blog posts around this topic, you can check them out here:
- Pulumi - What and Why?
- Pulumi - How it works?
- Pulumi - Configuration Management
- Pulumi - Secrets Management
In this blog post, I'm going to explore and understand how Pulumi manages the state.
What is State?
Pulumi manages the state (in the form of a state file - a JSON file). This is the source of truth for Pulumi. Whenever you make any change in your program, Pulumi refers to that state and checks with resource providers to determine what action needs to be taken (update, delete, add or nothing). Each stack in Pulumi has it's own state file.
Pulumi keeps this state file in a backend. By default, pulumi offers it's own free backend service (http://pulumi.com), it works seamlessly and offers a nice UI on top of it where you can see what's going on during the lifecycle of any program and stack. However, as mentioned earlier, we can take complete control of the state management. This is where, we can either keep the state locally or in any other backend such as Azure Storage (which we will explorer in here a bit later). You can read more about the advantages of using Pulumi's hosted backend here
Using Azure Storage as a backend
You can use any backend (e.g., Local file system, AWS S3, Google Cloud Storage etc.) to manage your state but for this blogpost let's focus on Azure Blob Storage.
For this, we need to first create a storage account and a container within that. You can perform all of the following operations via Azure Portal if you feel comfortable with that.
Create a resource group
az group create --name rg-pulumi-state-dev --location australiasoutheast
Create Storage Account
Create an account
$SA=$(az storage account create --name pulumiazstate --resource-group rg-pulumi-state-dev --location australiasoutheast --sku Standard_LRS --access-tier Hot --https-only true --kind StorageV2)
Extract keys
$KEYS=$(az storage account keys list --account-name pulumiazstate --resource-group rg-pulumi-state-dev --output json)
Set Environment Variables
We need to set AZURE_STORAGE_ACCOUNT and AZURE_STORAGE_KEY as environment variables so that the CLI can use them while performing other operations. You can set them manually or via script. Here is the PowerShell / CLI combination to set them.
[System.Environment]::SetEnvironmentVariable('AZURE_STORAGE_ACCOUNT','pulumiazstate')
[System.Environment]::SetEnvironmentVariable('AZURE_STORAGE_KEY',$(echo $KEYS | jq -r .[0].value)
Create a container in the storage account
az storage container create --name state
the command above uses the 'AZURE_STORAGE_KEY' environment variable we defined earlier.
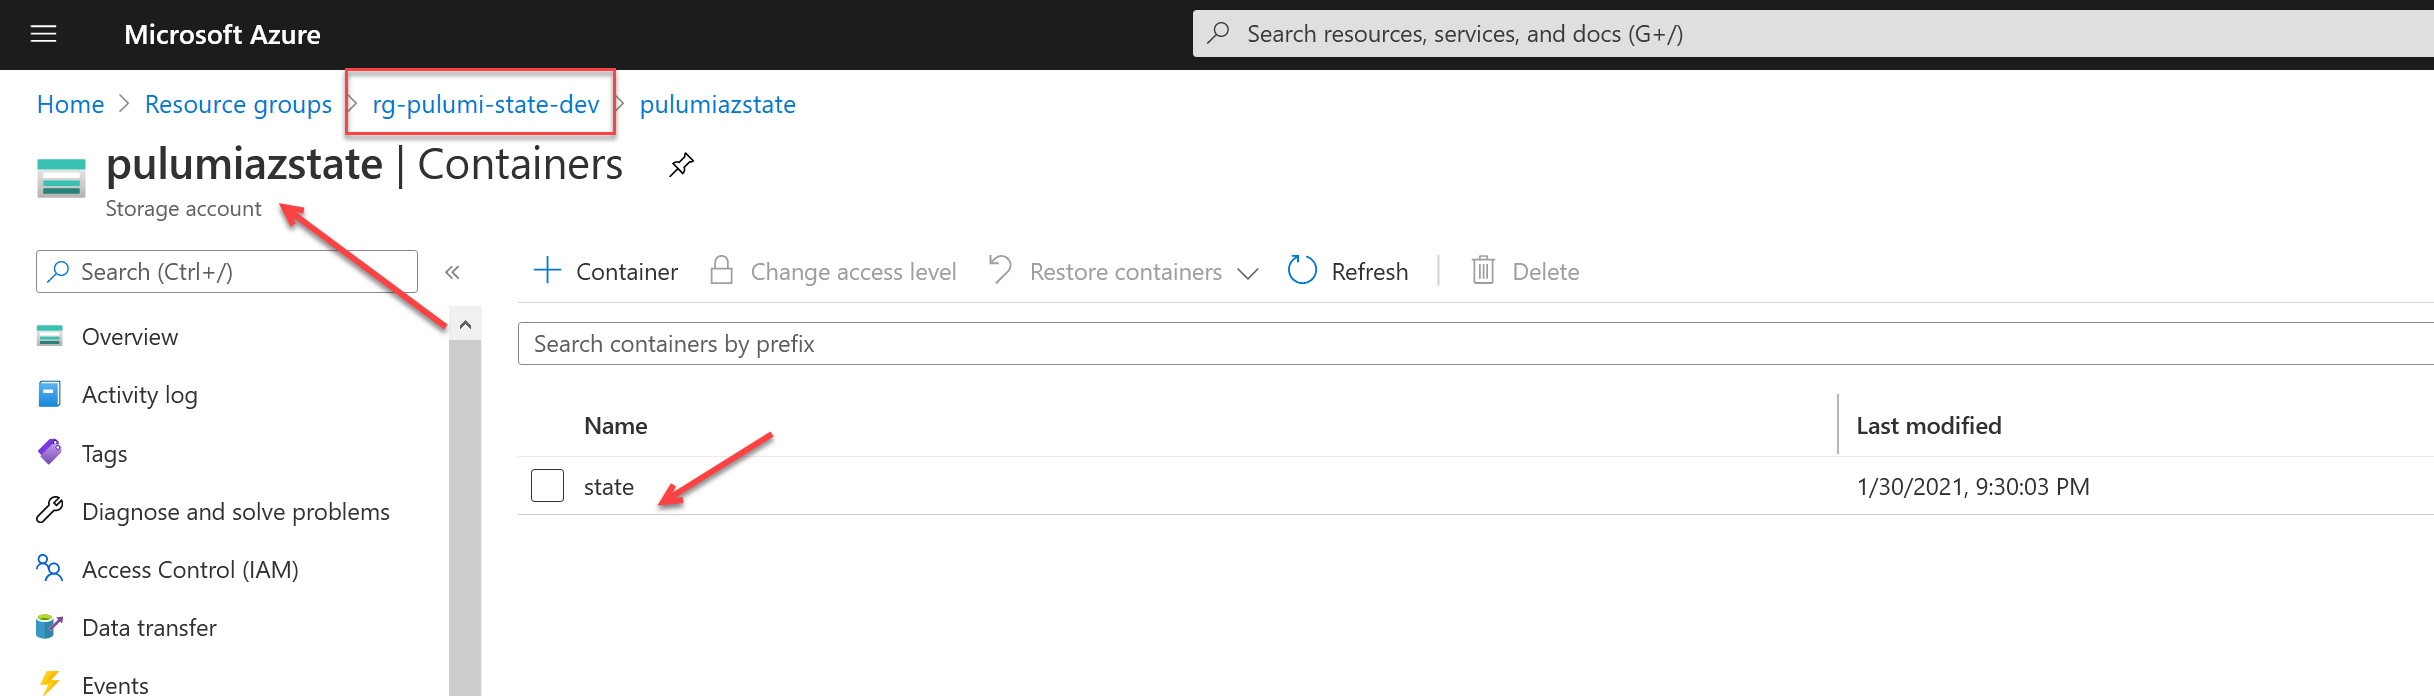
Head over to the Azure Portal to see the account and a container has been successfully created.
Set storage account as state backend
Now we have a storage account and a container ready, let's tell Pulumi to use that as a backend. Pulumi offers following command to do this:
pulumi login azblob://<container-path>
so go ahead and execute pulumi login azblob://state
Create a new stack
Create a new directory mkdir azbackend and navigate cd azbackend
From this point onward, the rest of the approach is similar to what we have done earlier. The only different being when you create a stack, you will be asked for a passphrase.
pulumi new
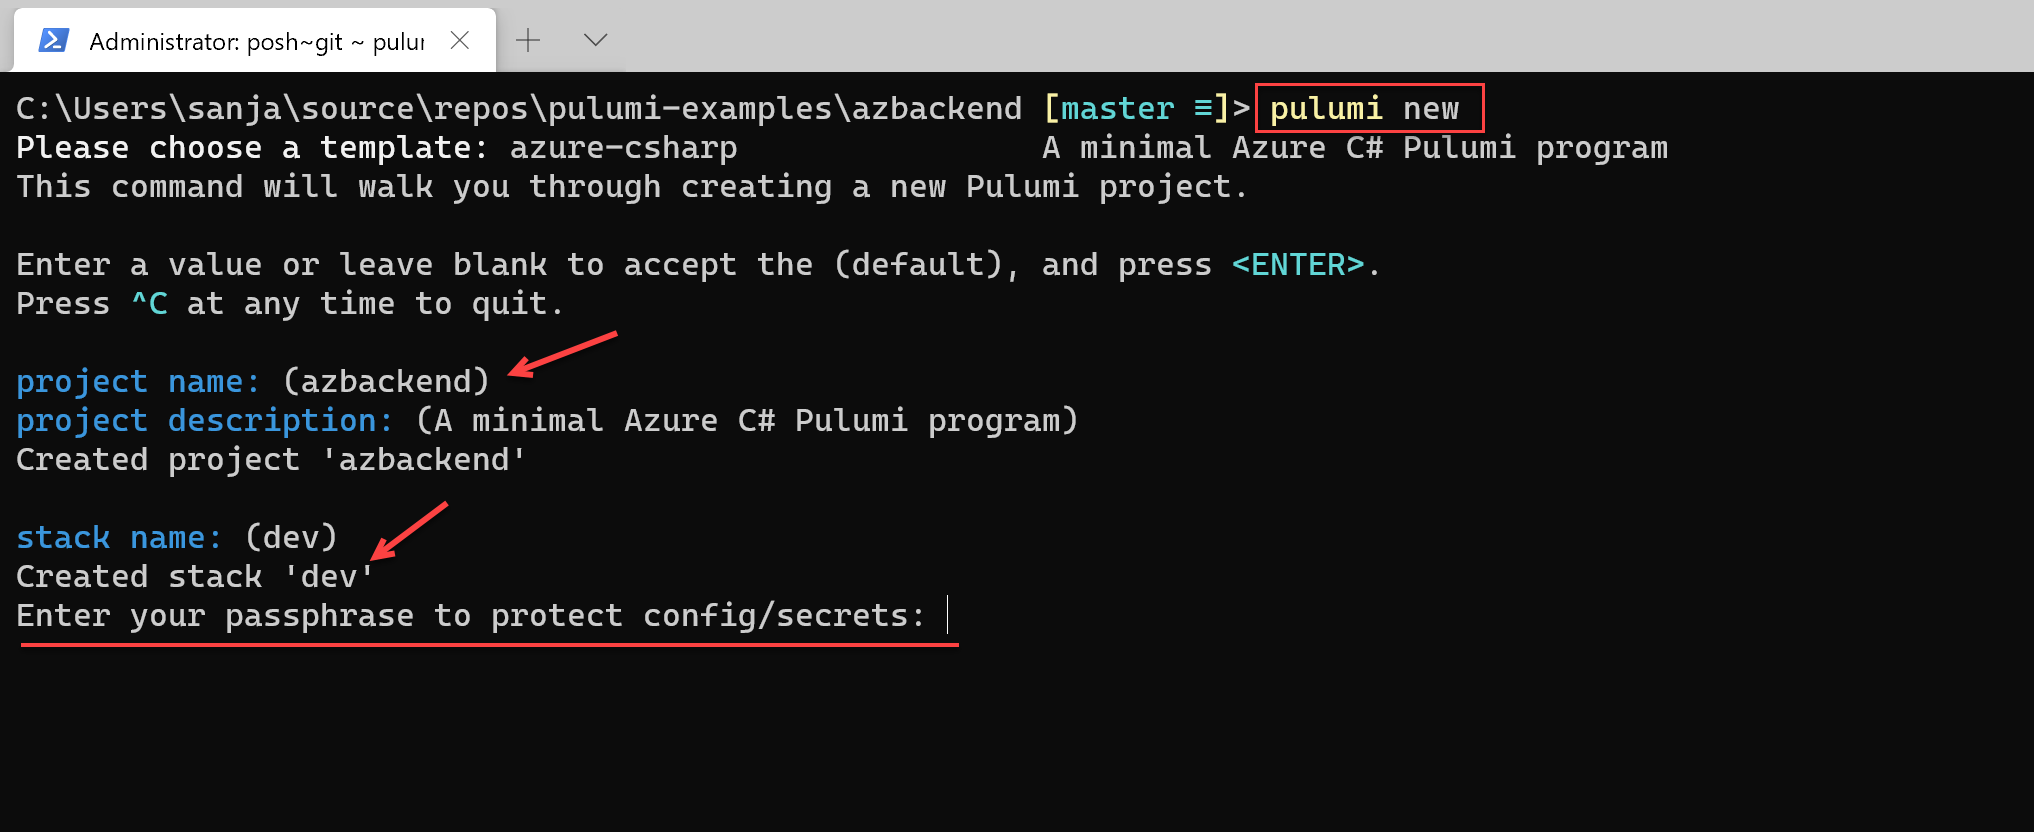
You can use the Azure key vault to manage the encryption if you will. Refer to my previous blogpost to see how that can be done.
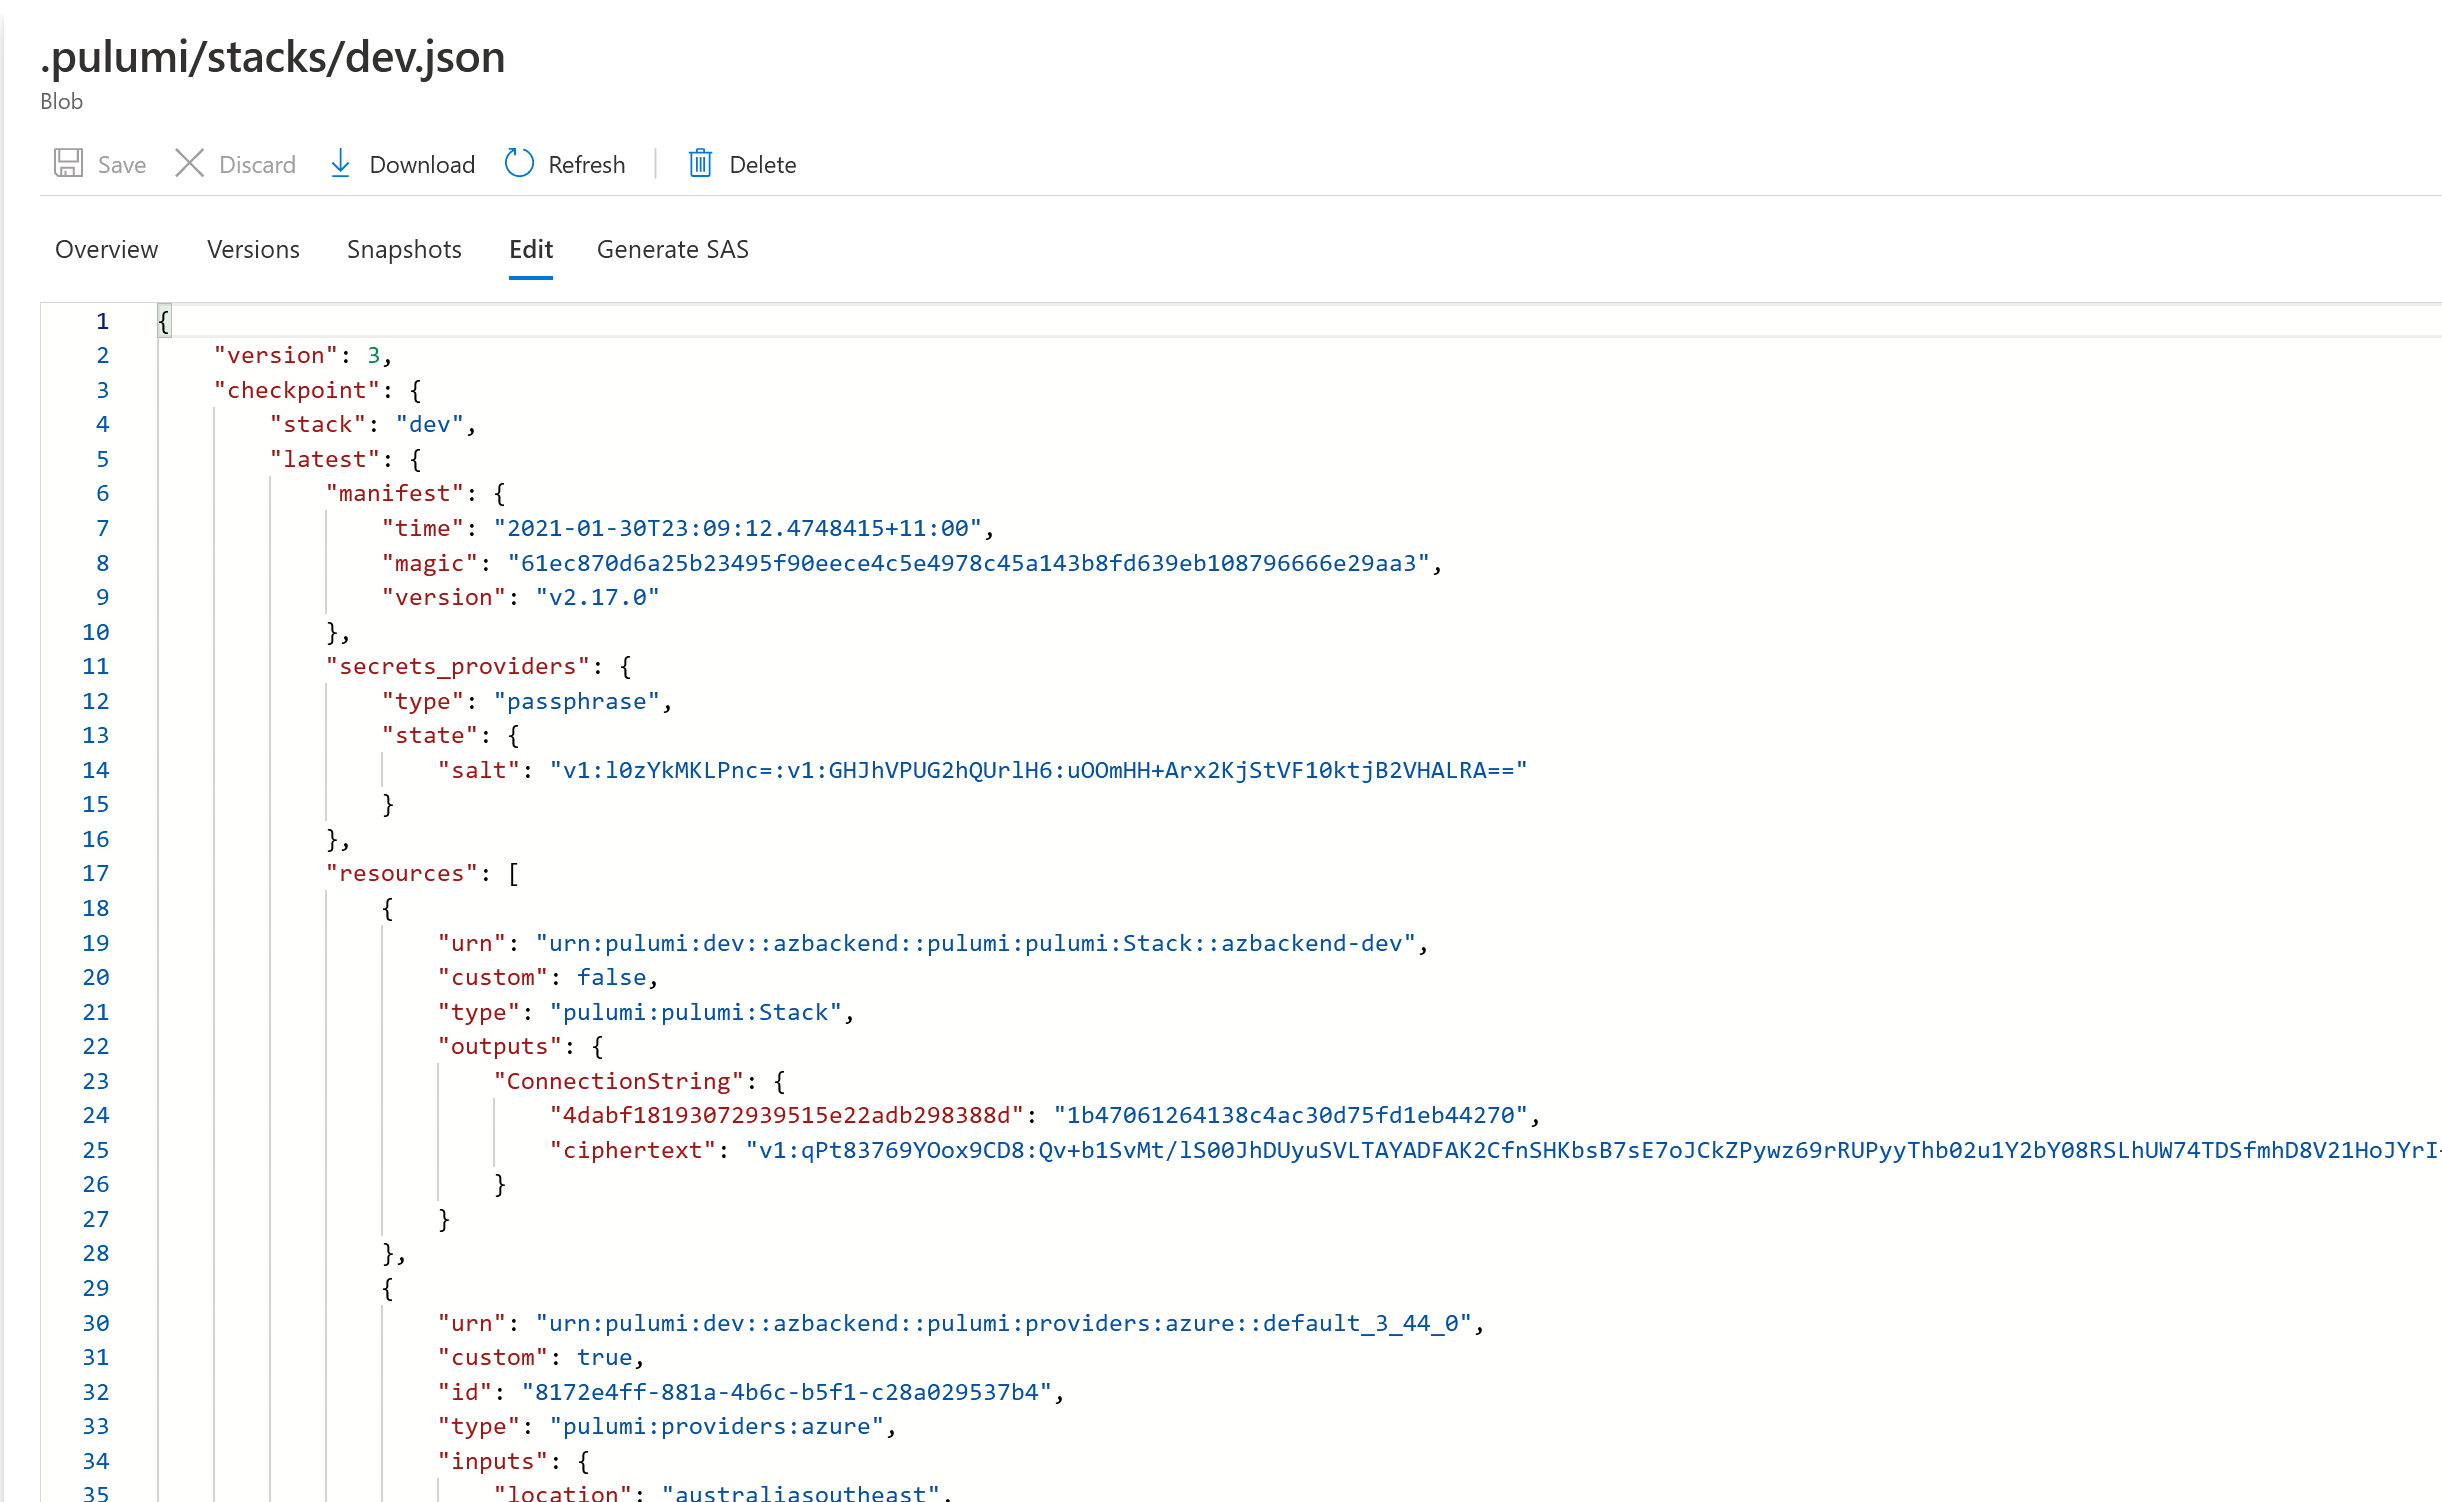
Now we have a stack created with our backend managed within Azure Blob Storage. If you head over to the container we created earlier, you will see a folder for the stack we created 'dev' and a JSON file.
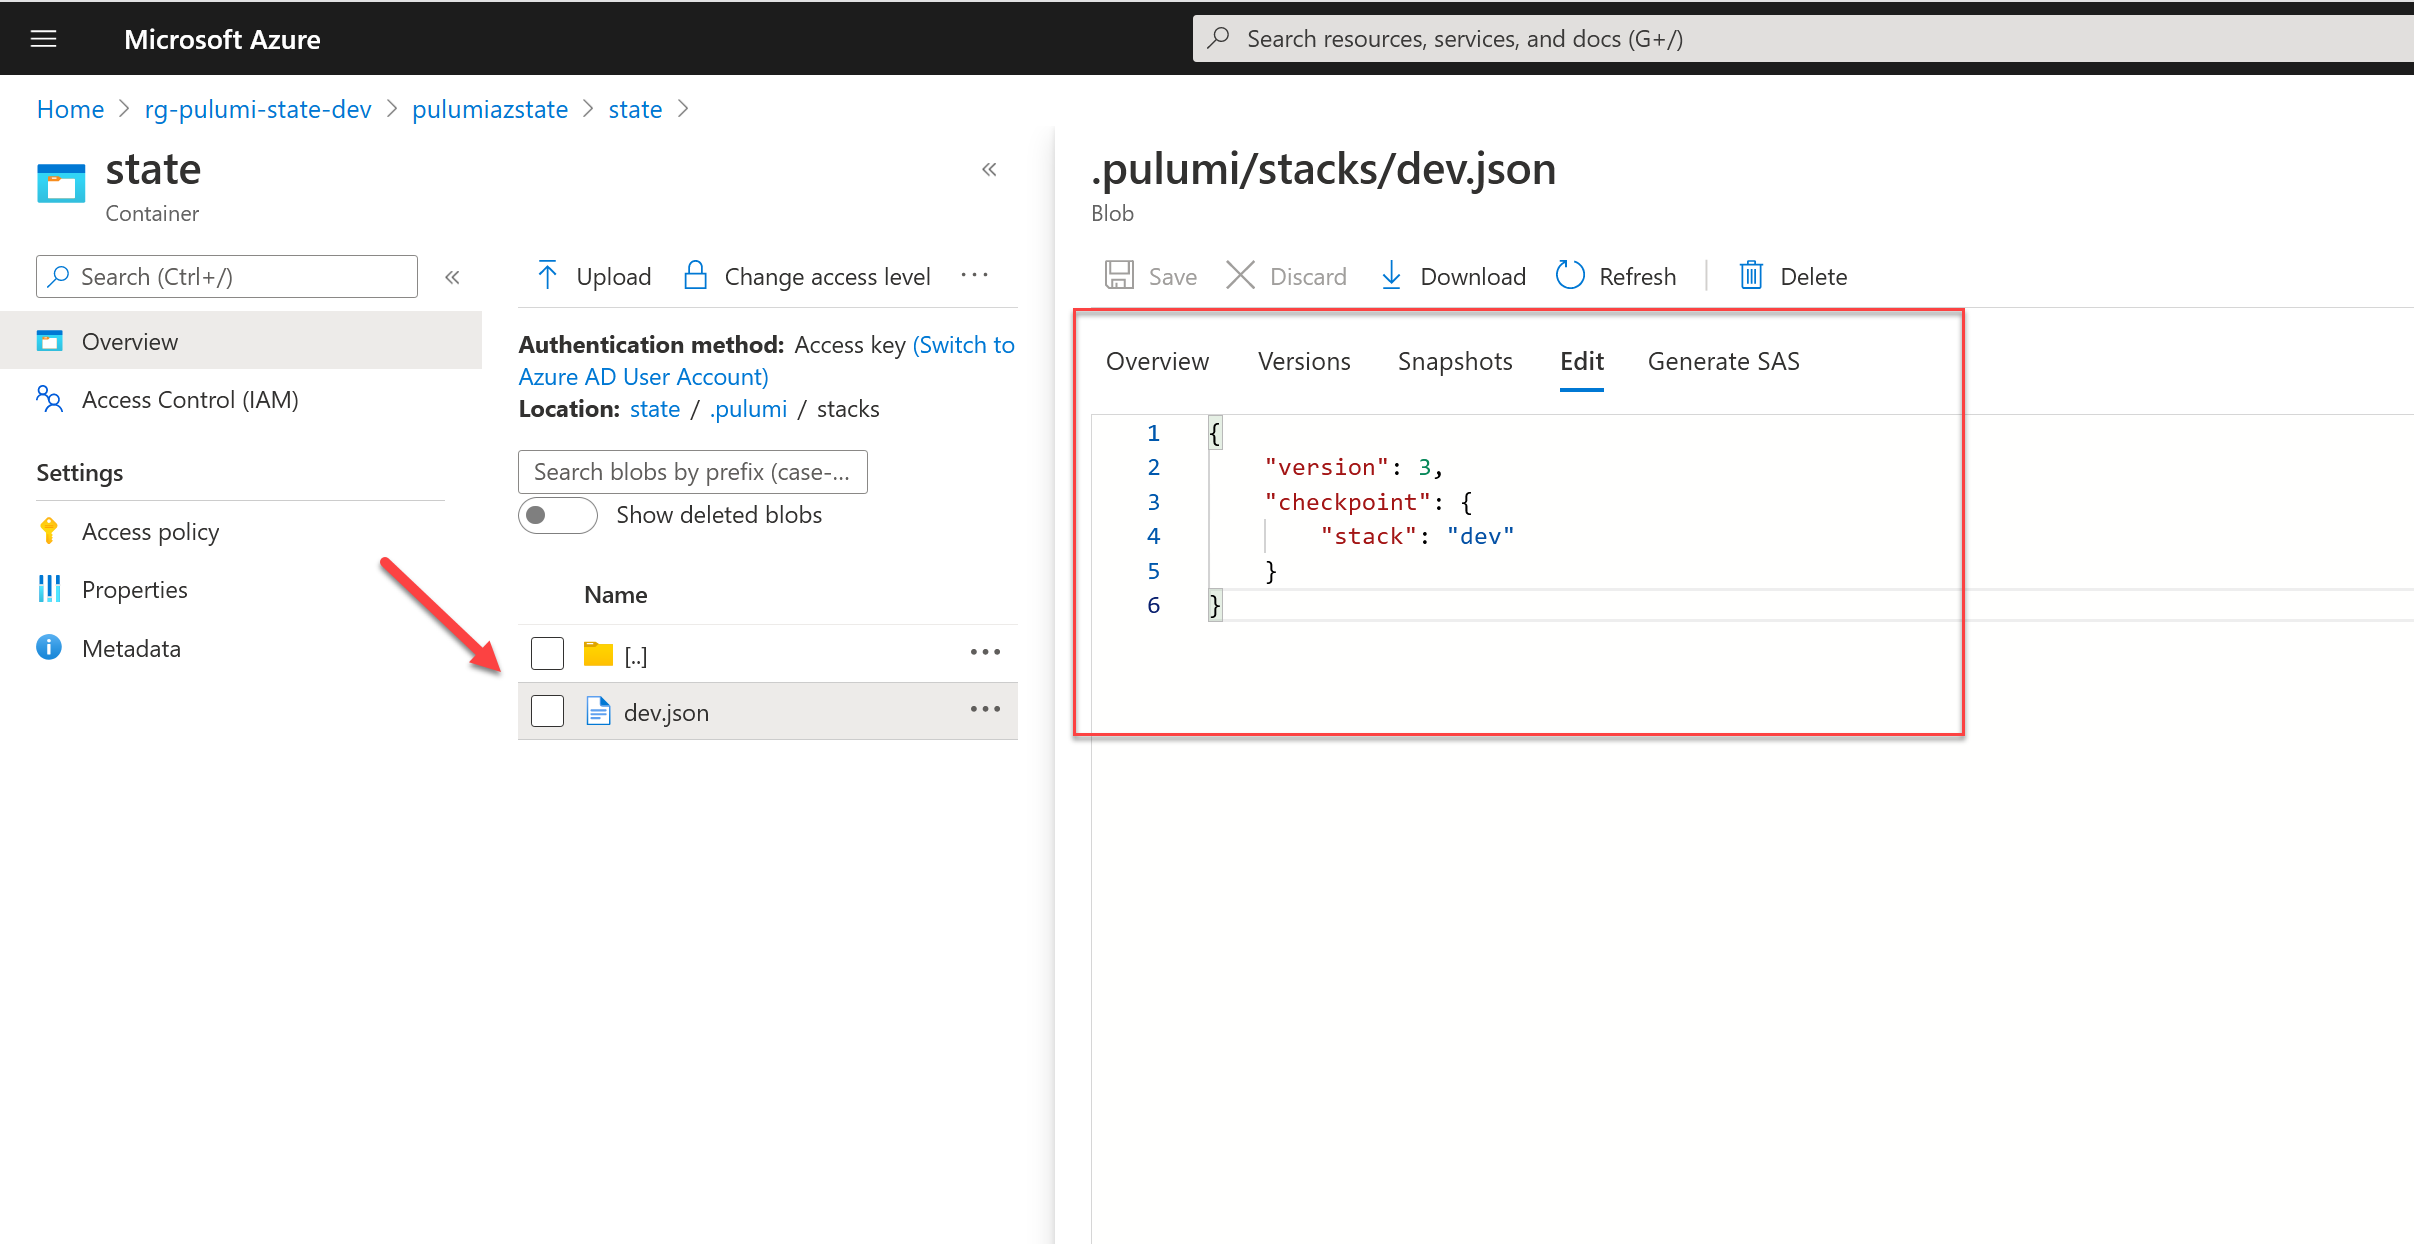
This is the checkpoint file or state file Pulumi uses where it keeps track of the state of our infrastructure. You can see the file contents directly from within the portal in edit mode.
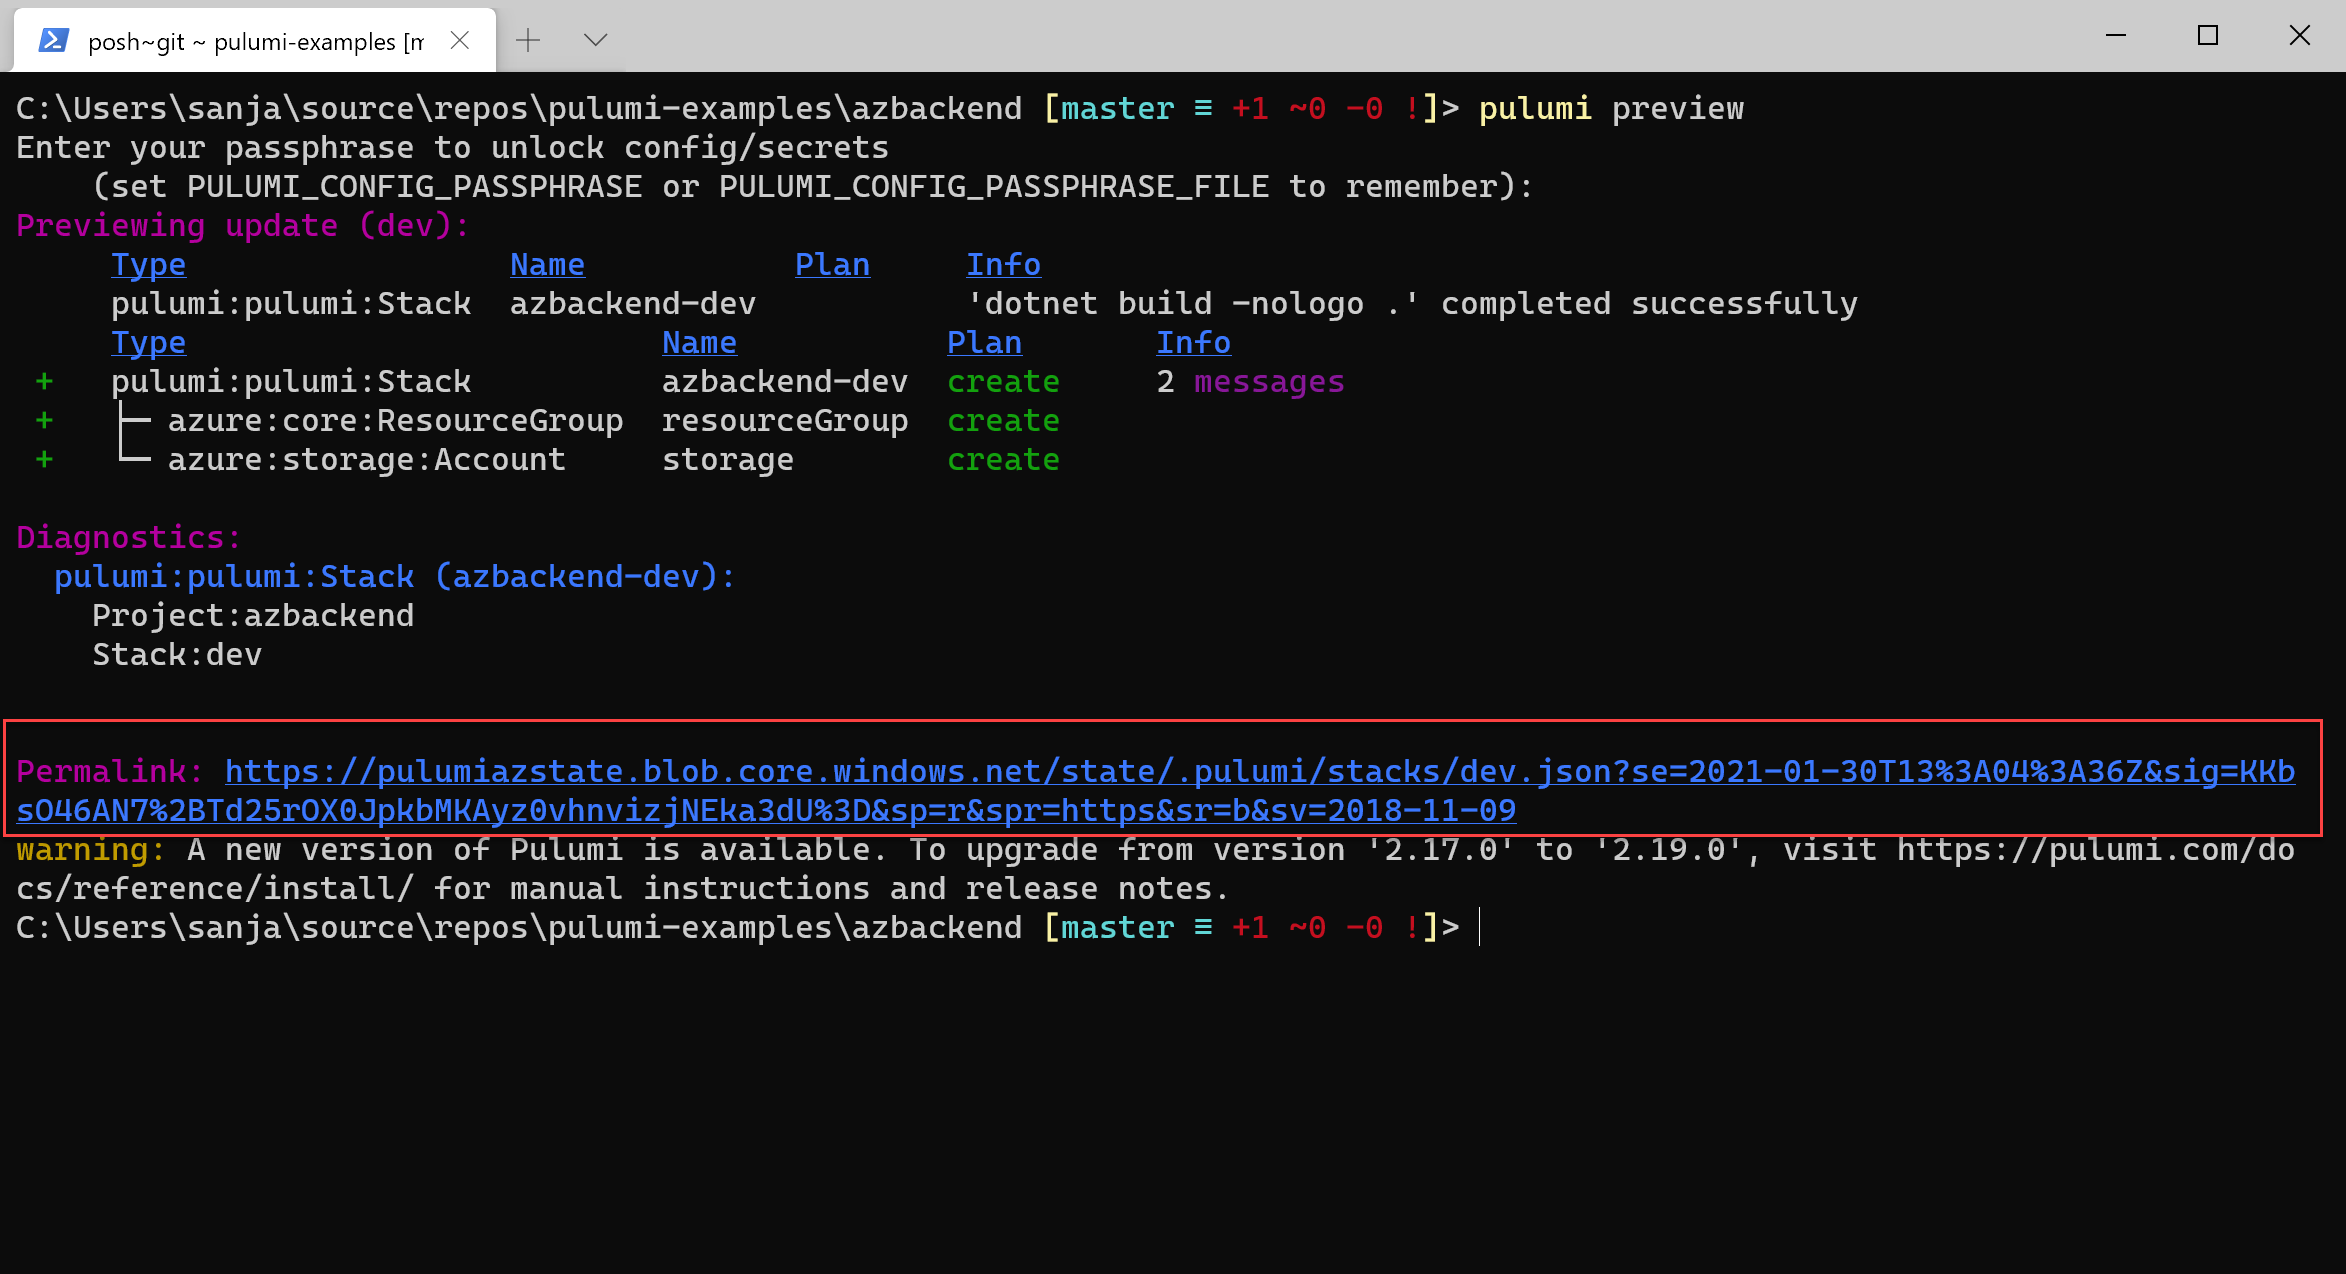
Preview the stack
If you go one step further and execute pulumi preview you will find everything works as usual. Notice, the URL is now pointing to our blob instead of Pulumi's backend.
Now, go ahead and execute pulumi up and let it finish. If you check the state file now, you will see a lot more content in there.
Logout
In order to work with external storage we used pulumi login azblob://<container-path> earlier. If you would like to switch to a different backend or return to the default one, you can use
pulumi logout
This simply logs you out and you can start with pulumi login again with the choice of your backend.
Interacting with the state via CLI
You can use some commands to interact with the state, such as:
pulumi state
pulumi state delete
pulumi state unprotect
If you would like to export the sate you can use pulumi stack export and pulumi stack import allows you to import the existing state to your stack.
Things to be aware of
Pulumi's default hosted backend service offers quite a several things that make our life easier. So when we decide to user any external backend systems, we loose some nice features that are worth being aware of.
No UI
First and foremost, if you use any external backend, you can't use the nice UI that pulumi.com offers. Which means, you will have to read the JSON file if you want to make sense of what is going on.
Security
Since state file contains encryption keys etc, it is our responsibility to secure the access to the storage account. Be sure you follow the principle of least privilege when it comes to setting up backends.
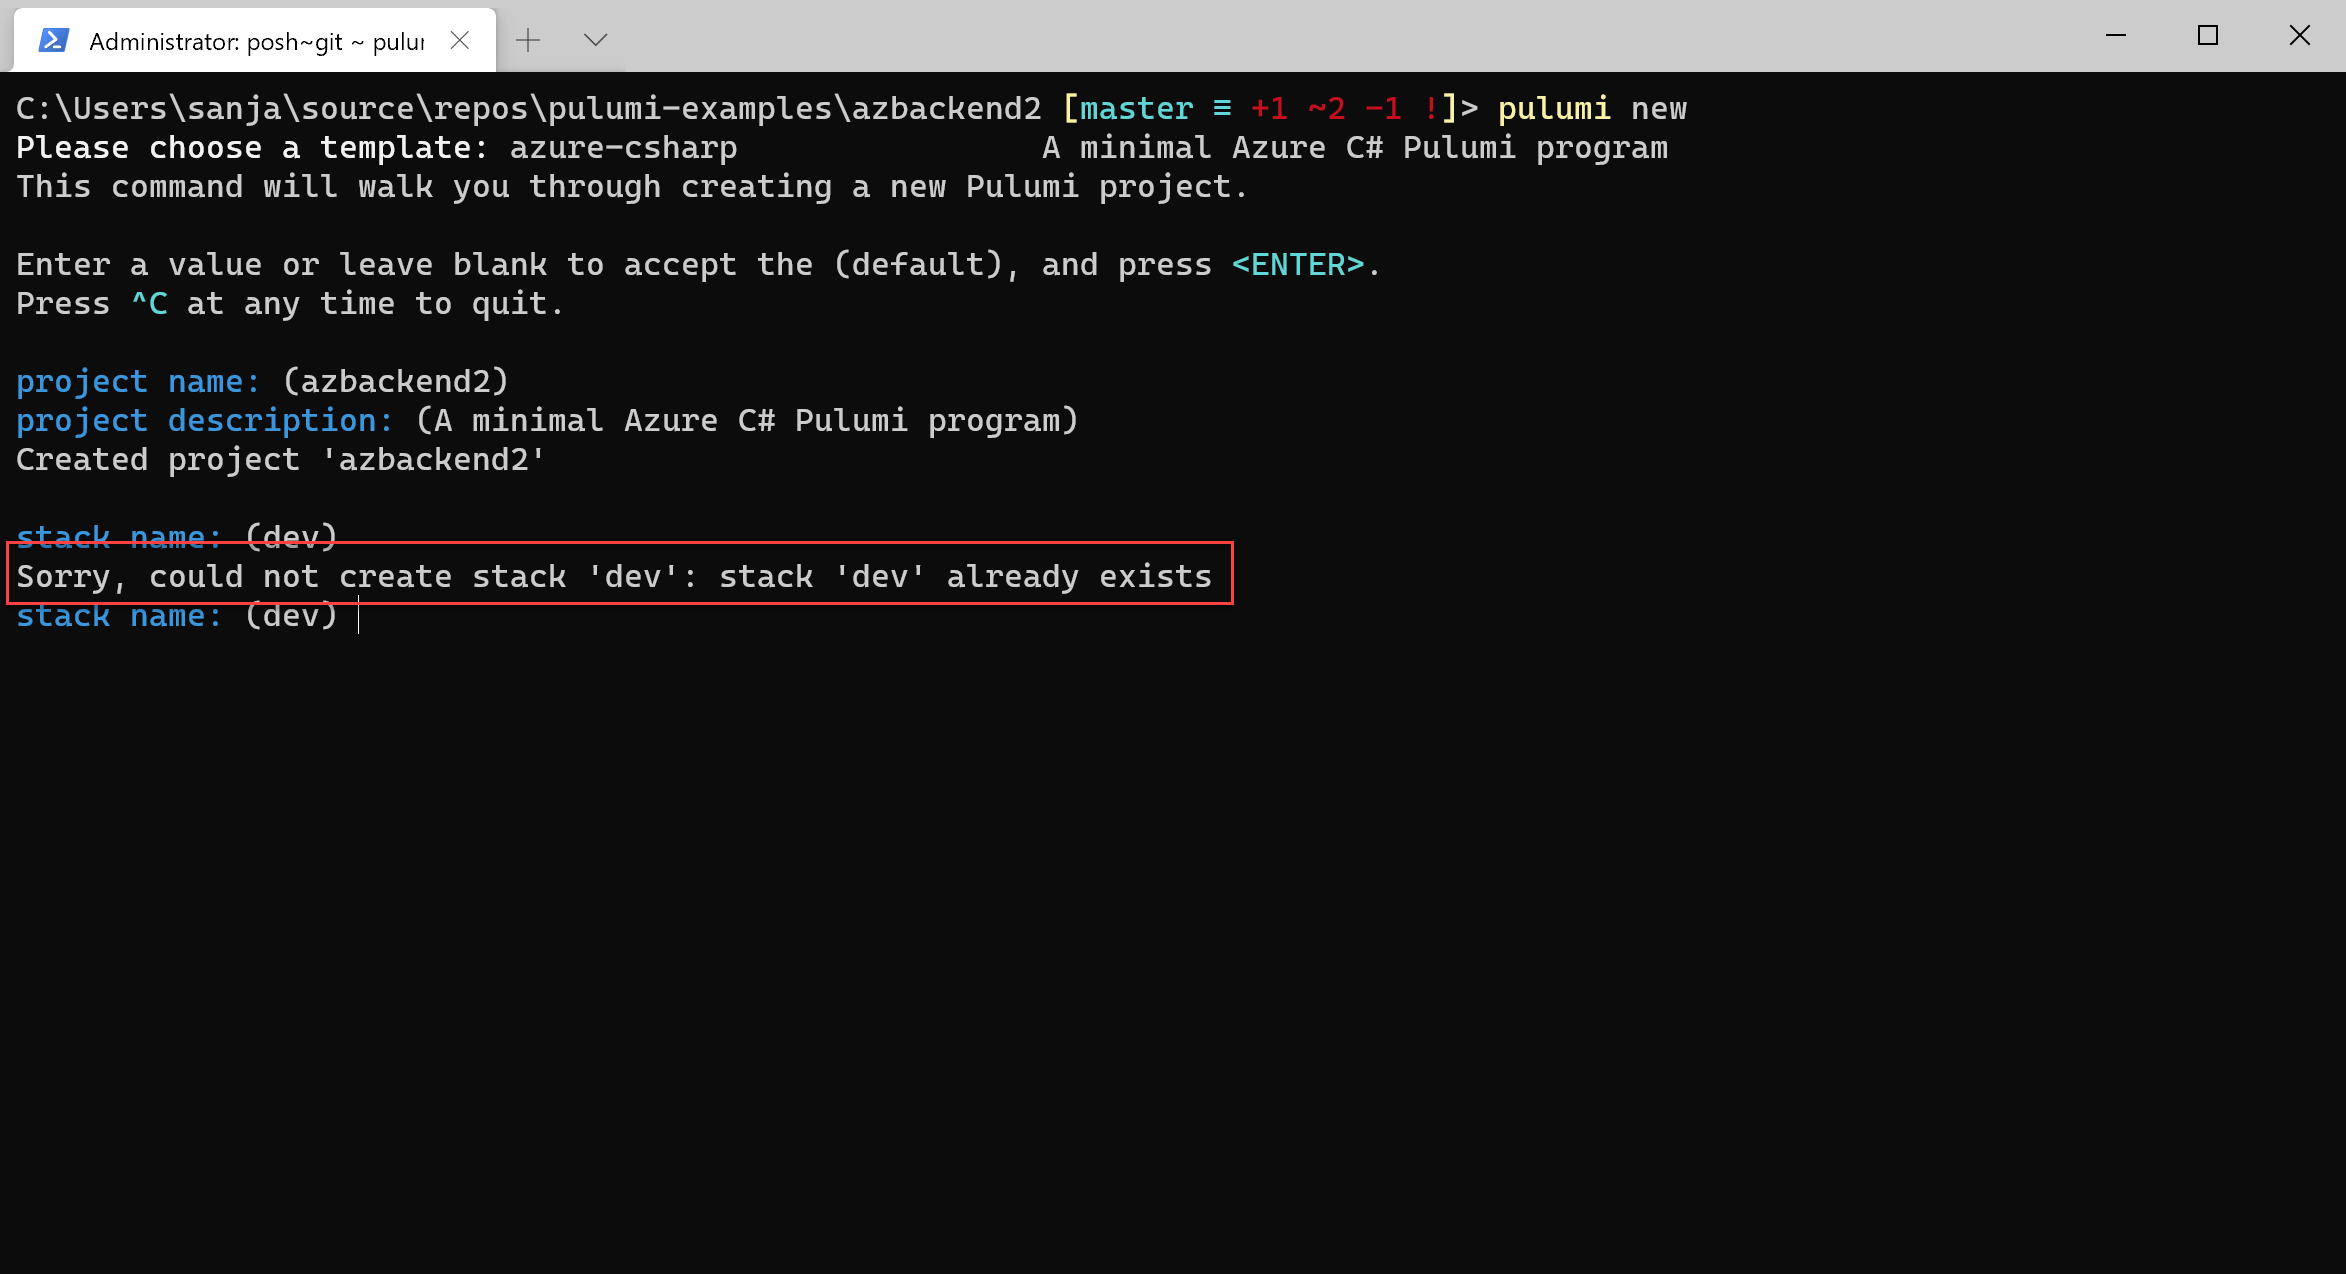
Stack names
when we use Pulumi's backend service it creates stack names as fully qualified names (projectname/stackname). Pulumi handles that behind the scenes and we get a good experience of having a separation of the project name for stacks. When we are using any other backend, we don't get that. Stack name is simply the name we mention at the time of pulumi new. So if we created a stack with dev already, we won't be able to create another stack with the same name. This forces us to set the strategy of naming our stacks from the get-go. To put it simply, Pulumi used fully qualified names for naming stacks (organization/project/stack) where as any other backend uses just the stack name. It is up to us to introduce the hierarchy.
Summary
Pulumi provides a robust and free hosted service to manage the state and backend but at the same time we can complete control over that if we want. We can use a file system, AWS S3, Azure Blob Storage and Google Cloud Storage to manage the backend by ourselves. The tools pulumi provides (CLI etc.) work similarly irrespective of the backend you use. However, you need to be aware of few things you might have to manage on your own if you choose not to use Pulumi's hosted backend service.
Cheers
comments powered by Disqus